These instructions are for Ubuntu 24.04 LTS but would work on other versions and flavours with some modifications.
We’ll start on the client side. Open a terminal or connect via SSH. Either prefix all commands with sudo or run sudo su -, just remember to exit after you’re done.
First install the agent, skip if it’s already installed.
wget https://repo.zabbix.com/zabbix/7.0/ubuntu/pool/main/z/zabbix-release/zabbix-release_latest_7.0+ubuntu24.04_all.deb

dpkg -i zabbix-release_latest_7.0+ubuntu24.04_all.deb

apt update

apt install zabbix-agent2 zabbix-agent2-plugin-*

systemctl enable zabbix-agent2
Generate PSK-key and write it to file.
openssl rand -hex 32 > /etc/zabbix/zabbix_agentd.pskSet correct owner and group on the PSK-file.
chown zabbix /etc/zabbix/zabbix_agentd.psk

chgrp zabbix /etc/zabbix/zabbix_agentd.psk
Change access rights to the PSK-file.
chmod 600 /etc/zabbix/zabbix_agentd.pskEdit the Zabbix Agent config-file.
nano /etc/zabbix/zabbix_agent2.confAdd/edit the following lines (TLSPSKIdentity is unike for every client):
TLSConnect=psk
TLSAccept=psk
TLSPSKIdentity=PSK001-STLLOSTSELLA001
TLSPSKFile=/etc/zabbix/zabbix_agentd.psk
Also edit/add necessary information:
Server=zabbix.domain.com
ServerActive=zabbix.domain.com
Hostname=stllostsella001
Save and exit nano:
Ctrl + O
Enter
Ctrl + X
Start the service.
systemctl start zabbix-agent2Write out the PSK-key and copy it.
cat /etc/zabbix/zabbix_agentd.pskWe are now done on the client side and we can close the terminal or connection.
Go to your Zabbix web-frontend ex.: https//zabbix.domain.com/zabbix
Login and go to Data Collection/Hosts.
Create host or click on a existing host.
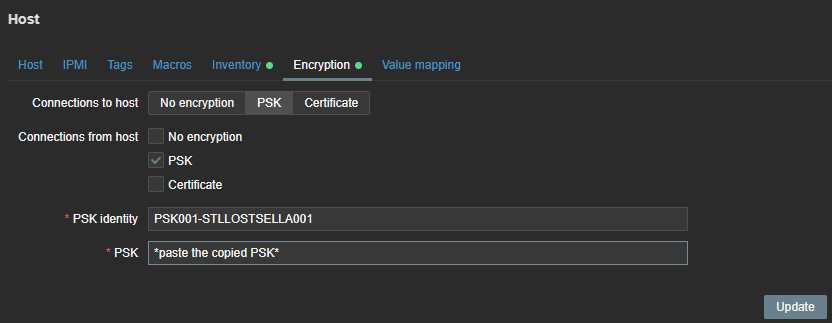
Go to the Encryption tab.
Select PSK and PSK, also supply the identity and paste the PSK-key. Hit Update.

Look at the far right under “Agent encryption” it should look like this, PSK in green:

All done.